Marble Inscription
Object property of The British Museum

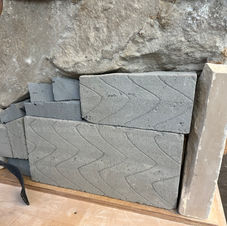
Marble Inscription before treatment
Photo property of The British Museum

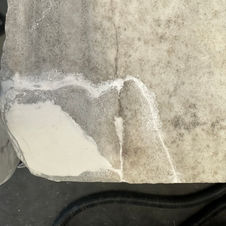
Marble Inscription after treatment
Photo property of The British Museum
Condition before treatment
The inscription was mounted to one of the museum's inscription galleries with plaster. After investigative clearing of the plaster with the chisel, it appeared that the back and bottom surfaces were lined with a single piece of lead sheet, so a careful extraction procedure was followed, taking into account the Health and Safety regulations when dealing with lead.
The inscription’s surface had debris and staining in the from of water marks and abrasion marks. Some areas were chipped and there were areas of small degree of delimitation as well.
The marble inscription rests on three limestone blocks, which cover the front and sides but leave the middle back hollow. The limestone is attached to the blocks with a type of resin bulked with slate and wooden wedges.
It is not possible to confirm the presence of dowels connecting the marble with the supports.
Treatment
-
The marble inscription was removed from gallery using chisels. The whole of its back and bottom surfaces were lined with a single lead sheet acting as a barrier between the stone and the wall.
-
The top surface was poulticed two times with Laponite RD (sodium magnesium lithium silicate) to produce a uniformly cleaned surface. A barrier of archival interleaving tissue was placed between the poultice and the marble. The surface was then rinsed with deionised water applied with a stencil brush.
-
The front, sides and back of the inscription were cleaned with the steam cleaner using deionised water and excess water was dabbed off the surface with tissue.
-
The old fill on the back left corner of the inscription was softened by wetting the plaster with deionised water using cotton wool pads and removed mechanically with a scalpel . A new fill was introduced made with microballoons (silica or phenolic resin) with a skim finish of Flugger (acrylic putty) and toned-in to match the surrounding fabric using Winsor and Newton acrylic pigments.
-
The old adhesive which appeared to have stained the stone underneath the fragments, was removed by consecutive swabs of cotton wool with acetone (propan-1-one/dimethyl ketone).
-
The base of the inscription supported by limestone blocks it rests upon, were attached on a plywood sheet which was coated with 20% Paraloid B72 (ethyl methacrylate copolymer) in IMS (Industrial methylated spirits (ethanol, methanol) : Acetone (propan-1-one/dimethyl ketone)1:1) using Bonda filler SL (polyester, inert filler)
-
Celcon blocks were cut to shape and adjusted to fit in the hollow back of the inscription. Before adhesion they were consolidated with 20% Paraloid B72. These were secured in place with Bonda (polyester, inert filler).
-
The limestone blocks and celcon were coated with Polyfilla (calcium sulfate hydrate, cellulose ether) with added PVA (polyvinyl acetate) in consecutive layers, allowing for the drying of the material before the next layer was applied.
-
The thin gap between the inscription and the supporting limestone blocks were filled in using microballoons (silica or phenolic resin), in a 20 % solution of Paraloid B72 (ethyl methacrylate copolymer) in IMS (Industrial methylated spirits (ethanol, methanol) : Acetone (propan-1-one/dimethyl ketone)1:1).
-
The base was then finished off using various grades of sanding paper and was toned in to match the surrounding fabric with Winsor and Newton acrylic pigments.
Condition after treatment
The inscription is now securely adhered to a base which would allow for it to be exhibited free-standing. The surfaces are clean and the delaminating areas stable.


